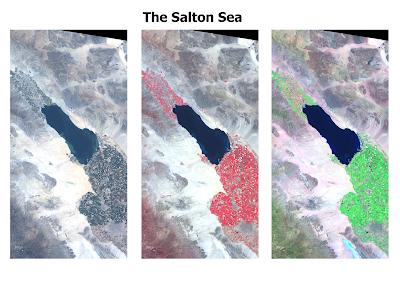
QGIS print composer can be a bit daunting and confusing. It is equivalent to the Layout View in ArcGIS, where users can setup their map for printing and publication. One common task is to create side-by-side maps, to compare imagery, choropleth, or other types of maps. I looked but could not find a good tutorial with screenshots, so here we go!
Purpose
To create three side-by-side maps of different band combinations from Landsat 7 imagery of the Salton Sea. The maps will be exactly the same size. The different band combinations were created using the Orfeo Toolbox->Image Manipulation->Images Concatenation and selecting various band combinations.
Step #1: For starters...
I've started by just selecting the natural color view (bands 3-2-1). Go to the the Project Toolbar in the upper left-> New Print Composer.
- You can also can the page layout to landscape or portrait, depending on whether your map series will be laid out horizontally or vertically.
Step #2: Creating the first map


Click the "Add New Map" button, highlighted in red. and draw an area for your map on the blank page. For best fit of your image, be sure in QGIS to have zoomed into an area of interest.
- Then on the right hand side of print composer, select "Item Properties" and click the long button for "Set to Map Canvas."
Step #3: Add the second map

Before adding the second map to the right, scroll up in "Item properties" and check the box for "Lock layers for map item." The click on the existing map in print composer and copy and paste it. On this second map, be sure to uncheck the box we just checked: Uncheck "Lock layers for map item."

- In QGIS, add the next layer, in this case I added a false color image from bands 4-3-2.
- Go back into Print Composer and hit the blue refresh button.
- The second map should display the false color image and the first map should remain natural color.
Step #4: Repeat for the third map
Before copying and pasting, make sure to check the "Lock layers for map item" box. Copy, paste, and then uncheck this for the third map, with the last set of band combinations (7-4-2). The final map appears below.
Before copying and pasting, make sure to check the "Lock layers for map item" box. Copy, paste, and then uncheck this for the third map, with the last set of band combinations (7-4-2). The final map appears below.
For more information:
You can find additional tips about using the map composer from multiple frames and different layers in this discussion on StackExchange: http://gis.stackexchange.com/questi...mes-with-different-layers-in-one-print-layout
You can find additional tips about using the map composer from multiple frames and different layers in this discussion on StackExchange: http://gis.stackexchange.com/questi...mes-with-different-layers-in-one-print-layout
أكثر...


