Hi FME’ers,
I recently finished updating the FME Desktop training for 2016. The Performance chapter in the advanced manual is always one of the most difficult to put together, but also the most rewarding. It shows how just a few small changes can make a huge difference to a workspace.
This post is just a very quick overview of that chapter, showing the exercise we cover, what changes we make, and how much its performance improves.

Starting Workspace
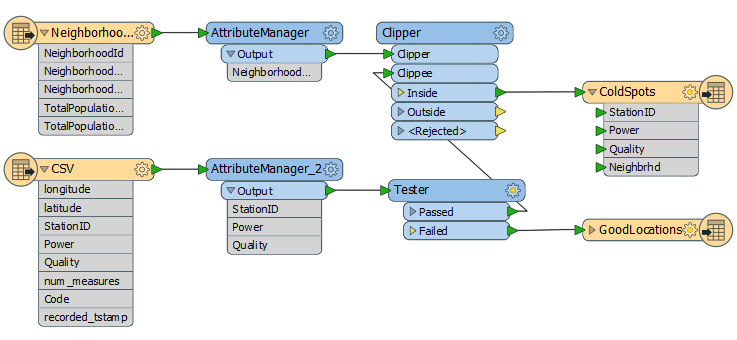
Here is the workspace we start with in the training:

At first glance there really isn’t much wrong with it. We’re reading some CSV data (1.7m records) representing cell phone calls, finding out which neighborhood (6 features) each CSV record falls inside, and writing out the ones with poor signal strength to a Shape dataset. In that way we hope to find out which neighborhoods have the worst signal strength.
Running the workspace in FME I get this result:
INFORM|FME Session Duration: 11 minutes 6.5 seconds. (CPU: 306.7s user, 37.8s system) INFORM|END - ProcessID: 50764, peak process memory usage: 2966368 kBBasically 11 minutes of time and 3GB of memory. But can we improve on that?
There are various things we check for in the training, and minor techniques we use, but let’s focus on four big ones.
Writer Order
I’ve already covered in a previous post why writer order is important and how it affects a translation, so I won’t go into it in depth. Suffice to say that when you have multiple writers the one handling the most data should be triggered first, and I can do that using the order of writers in the Navigator window:
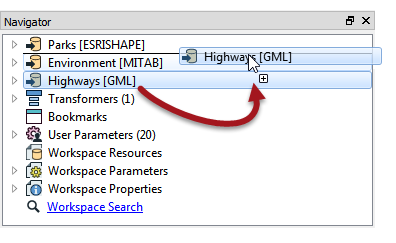
In this exercise the Writer handling the most data was not first in the list. When I changed it here the performance improved to this:
INFORM|FME Session Duration: 4 minutes 1.9 seconds. (CPU: 219.7s user, 19.4s system) INFORM|END - ProcessID: 46312, peak process memory usage: 1776304 kBThat’s saved 7 minutes and cut the amount of memory to nearly half!
Remove Attributes
You probably know that removing attributes is good for a workspace, but perhaps you don’t know quite how much.
In our workspace there aren’t that many attributes to start with, but there are 1.7m CSV records so that can add up to a sizable amount. I even remove the excess attributes from the neighborhood features. It’s true there are only 6 features and a handful of attributes, but each feature’s attributes is being copied 1.7m times by the Clipper. That’s a lot of work.
So, by using AttributeManagers to get rid of excess attributes, and by dropping an unwanted Logger transformer, performance is now improved to this:
INFORM|FME Session Duration: 3 minutes 36.2 seconds. (CPU: 194.4s user, 19.9s system) INFORM|END - ProcessID: 53072, peak process memory usage: 1349336 kBThat’s about 10% faster and let’s say 20% less memory, so it’s well worth doing.
Clippers First
The performance bottleneck for most workspaces is a group-based transformer. These are transformers that operate on the whole set of data at once, rather than a feature at a time, and so take up a lot more memory resources. However, most group-based transformers have parameters to reduce the size of groups processed. “Input is Ordered By Group” is a common one, but in our workspace the key is the Clipper Type parameter and being able to set it to Clippers First:
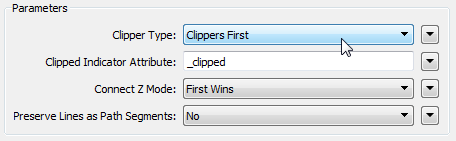
Now each clippee feature can be processed at once, and not stored in memory, because FME knows it already has the full set of possible clippers. The result? This:
INFORM|FME Session Duration: 3 minutes 41.1 seconds. (CPU: 200.7s user, 18.7s system) INFORM|END - ProcessID: 52820, peak process memory usage: 96220 kBIt might not be quicker, but it sure has saved me a huge amount of memory usage.
Transformer Order
In the workspace screenshot above you might have noticed that we’re finding the neighborhood of every cell phone record, but we’re only writing out the neighborhood attribute to the low signal dataset.
Therefore, we could improve on things by rearranging the transformers like this:
All we’ve done there is put the Tester before the Clipper, but now our performance has improved to this:
INFORM|FME Session Duration: 1 minute 49.0 seconds. (CPU: 89.6s user, 18.7s system) INFORM|END - ProcessID: 53180, peak process memory usage: 95240 kBIncredibly that’s much faster than it was before. It’s a great illustration of how a little thought about the logic of a workspace can reap huge benefits.
Conclusion
The reason I wanted to post this outside of the training course is that I am stunned by how much I could improve FME performance by doing a few minor edits. Remember, the original workspace didn’t seem that bad. You might look at it and think that there wasn’t much that could be done to improve it. But four small edits later – about the same time it took you to read this article – and we have a workspace that is five times faster and uses 95% less memory! Everyone should be aware of these techniques.
Obviously your results – even for this translation – will be different with a different computer system, and the order in which I apply the fixes makes a difference in the relative improvement each provides. So I can’t guarantee that every project of yours will get the same improvement, but isn’t it worth taking the time to check?
If you want to try this exercise yourself, check the FME Training pages to either sign up for an advanced course or watch the on-demand recording (it should be available shortly).

The post FME 2016 Use Case: Performance Tuning appeared first on Safe Software Blog.

أكثر...
I recently finished updating the FME Desktop training for 2016. The Performance chapter in the advanced manual is always one of the most difficult to put together, but also the most rewarding. It shows how just a few small changes can make a huge difference to a workspace.
This post is just a very quick overview of that chapter, showing the exercise we cover, what changes we make, and how much its performance improves.
Starting Workspace
Here is the workspace we start with in the training:
At first glance there really isn’t much wrong with it. We’re reading some CSV data (1.7m records) representing cell phone calls, finding out which neighborhood (6 features) each CSV record falls inside, and writing out the ones with poor signal strength to a Shape dataset. In that way we hope to find out which neighborhoods have the worst signal strength.
Running the workspace in FME I get this result:
INFORM|FME Session Duration: 11 minutes 6.5 seconds. (CPU: 306.7s user, 37.8s system) INFORM|END - ProcessID: 50764, peak process memory usage: 2966368 kBBasically 11 minutes of time and 3GB of memory. But can we improve on that?
There are various things we check for in the training, and minor techniques we use, but let’s focus on four big ones.
Writer Order
I’ve already covered in a previous post why writer order is important and how it affects a translation, so I won’t go into it in depth. Suffice to say that when you have multiple writers the one handling the most data should be triggered first, and I can do that using the order of writers in the Navigator window:
In this exercise the Writer handling the most data was not first in the list. When I changed it here the performance improved to this:
INFORM|FME Session Duration: 4 minutes 1.9 seconds. (CPU: 219.7s user, 19.4s system) INFORM|END - ProcessID: 46312, peak process memory usage: 1776304 kBThat’s saved 7 minutes and cut the amount of memory to nearly half!
Remove Attributes
You probably know that removing attributes is good for a workspace, but perhaps you don’t know quite how much.
In our workspace there aren’t that many attributes to start with, but there are 1.7m CSV records so that can add up to a sizable amount. I even remove the excess attributes from the neighborhood features. It’s true there are only 6 features and a handful of attributes, but each feature’s attributes is being copied 1.7m times by the Clipper. That’s a lot of work.
So, by using AttributeManagers to get rid of excess attributes, and by dropping an unwanted Logger transformer, performance is now improved to this:
INFORM|FME Session Duration: 3 minutes 36.2 seconds. (CPU: 194.4s user, 19.9s system) INFORM|END - ProcessID: 53072, peak process memory usage: 1349336 kBThat’s about 10% faster and let’s say 20% less memory, so it’s well worth doing.
Clippers First
The performance bottleneck for most workspaces is a group-based transformer. These are transformers that operate on the whole set of data at once, rather than a feature at a time, and so take up a lot more memory resources. However, most group-based transformers have parameters to reduce the size of groups processed. “Input is Ordered By Group” is a common one, but in our workspace the key is the Clipper Type parameter and being able to set it to Clippers First:
Now each clippee feature can be processed at once, and not stored in memory, because FME knows it already has the full set of possible clippers. The result? This:
INFORM|FME Session Duration: 3 minutes 41.1 seconds. (CPU: 200.7s user, 18.7s system) INFORM|END - ProcessID: 52820, peak process memory usage: 96220 kBIt might not be quicker, but it sure has saved me a huge amount of memory usage.
Transformer Order
In the workspace screenshot above you might have noticed that we’re finding the neighborhood of every cell phone record, but we’re only writing out the neighborhood attribute to the low signal dataset.
Therefore, we could improve on things by rearranging the transformers like this:
All we’ve done there is put the Tester before the Clipper, but now our performance has improved to this:
INFORM|FME Session Duration: 1 minute 49.0 seconds. (CPU: 89.6s user, 18.7s system) INFORM|END - ProcessID: 53180, peak process memory usage: 95240 kBIncredibly that’s much faster than it was before. It’s a great illustration of how a little thought about the logic of a workspace can reap huge benefits.
Conclusion
The reason I wanted to post this outside of the training course is that I am stunned by how much I could improve FME performance by doing a few minor edits. Remember, the original workspace didn’t seem that bad. You might look at it and think that there wasn’t much that could be done to improve it. But four small edits later – about the same time it took you to read this article – and we have a workspace that is five times faster and uses 95% less memory! Everyone should be aware of these techniques.
Obviously your results – even for this translation – will be different with a different computer system, and the order in which I apply the fixes makes a difference in the relative improvement each provides. So I can’t guarantee that every project of yours will get the same improvement, but isn’t it worth taking the time to check?
If you want to try this exercise yourself, check the FME Training pages to either sign up for an advanced course or watch the on-demand recording (it should be available shortly).
The post FME 2016 Use Case: Performance Tuning appeared first on Safe Software Blog.
أكثر...